|
Parts Pile
Scrap Plate
|
If you're the type that enjoys building your own parts, then this
article may be of some use to you. If you're not handy with a torch
and friends then you'll probably do better purchasing ready made
brackets from one of the many vendors out there. Here a list of the
hard parts:
- 1978 Caddy Calipers (Remanufactured)
- 1974 Chevy Rotors from K20 (new)
- Flexible Brakeline (Brakeware PN: 77227 - banjo must be redrilled)
- Caliper brackets and spacers
- (8) 1/2" x 2 1/4" Grade 8 Bolts
To build the brackets you will need (2) 10"x10" 3/8" steel plates and
material to make (2) 5"x5" 5/8" spacer - you'll catch hell looking for
5/8" plate so sandwich together 1/4" and 3/8" plate or better yet get
some D.O.M. tubing and to cut four spacers from.
|
|
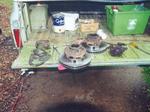
Tools and Such
|
|
On the shelf at the lower left you see the first bracket I made. I
learned a lot from that bracket. So much in fact, that I realized to
get things right I would have to remake a new set. Hey, no problem!
Hopefully you will be able to learn from my mistake(s) and knock your
brackets out in just a few hours... On the bench you see the cutout for
the caliper and some of the tools used. A drill press is a good idea
to help start tapping the caliper bolt holes otherwise all you'll need
is basic hand tools, measuring devices, etc.
|
|
First Cut
|
The first thing I do is layout the basic form of the plate with a
carbide tipped scratch awl. I work from a centerline as the does the
blueprint I've included below. If you are using scrap steel, be sure
the plate is not warped or the fit and finish will suck.
|
|
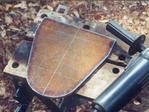
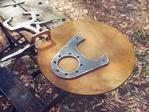
Basic Bracket
|
The basic bracket is cutout at left. You can see the centerline pretty
well in this picture. After I make two matching plates I tack weld
them together and clean them up with a side grinder and sanding disk.
Keeping them together while working assures that the two parts
will be identical and you'll only have to drill and cut once instead
of twice.
|
|

Spacer
|
Here is a good shot showing the layout on the spacer. This little
bugger caused me all sorts of problems with heat related warpage.
I though I was being smart laying out punch marks for the mounting
bosses and predrilling them before cutting out the centers. HA! Under
the intense heat of the torch the holes moved and I made 4 or 5 spacers
before I got the fit just right. I think next time I will source some
DOM tubing to make the spacers. Whew! Nasteah job!!!
|
|
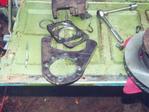
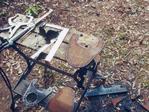
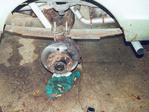
Brackets and Spacers
|
Here we are with brackets and spacers mostly completed getting ready to
install and test. Let me just say again that those spacers were a
bitch to make. It would probably be different if I had a plasma cutter
to keep the heat down.
|
|
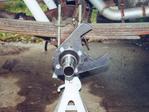
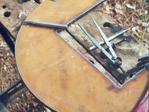
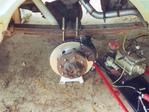
Test Fit
|
Here is the first bracket before I drilled for the caliper pins. When
I finally got to drilling and tapping for the pins I realized there
was no way I could start the tap and guarantee that the tap would stay
on center so I would up buying a drill press. What the heck I needed
it for other things but there are tools available to keep the tap
on center and prependicular to the plate...
|
|
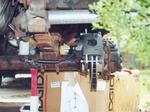
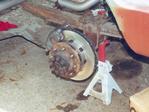
Fully Assembled
|
|
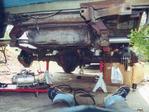
Well here is the completed installation. I have a couple of pictures I
will to insert above detailing the brake line mount but it's just too
wet for my digital camera right now :-). Total cost for parts was something like $250 at the parts store and $5 at the scrap yard. Since
this was the first time I did this kinda thing, labor cost was high.
I think I could do it start to finish now in about 4 hours
freehand (no jigs). Realistically you can purchase these brackets
for less that $100.00 and that is worth it unless you have more time
than money...
|
|
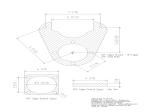
Caliper Bracket Image
|
I used QCad under
Linux to create this
blueprint but it is probably broken since it is from what I can
remember of the project 2 years ago... I have not had time to
do it with autocad. Click the image at the left to view a fullsize
pic of the blueprint. This was recrated from my notes that were 2
years old so they may be slightly incorrect. I've been running this
setup for 2 years or so and it seems to work very well. Offroad use
only. No warranty... blah, blah if it breaks you gets to keep both
pieces...
|
|


)