|
Right Side
Left Side |
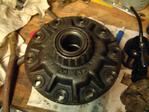
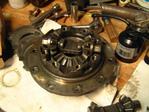
Here is our guinea pig! A PowerLok from Precision Gear. I bought this thing
used from Shaggy on
ColoradoK5. Shaggy sold it cause he ate a ring and pinion and the D44
no longer tasted good to him. He went D60. When I got it I opened it up
and found the clutch pack had eaten some metal so I ordered a clutch
pack from Florida4x4 Forum
member Toy Maker. (BTW: Shaggy sent me the cash for the new clutches
since he advertised the PL in perfect condition. Way to go Shaggy!! Way Cool!!)
So anyway, I fully intended to install the PL in my 72 Jimmy but little did I
know I would find a deal on a D60. Hey who's complaining? Not me!
Before I shipped it to the new owner I installed the new clutches. The unit
is really simple but I called Precision Gear "just in case". Tech support
was really helpful and took time to explain the function and assembly of the
unit. The clutch pack had a couple of concave (or convex if you look from
the other side) plates that can modify the action making it more or less
agressive. Read on!
Click on the images for a larger pic...
|
|
Alignment markings
|
I don't know for sure if the case can be assembled backwards, 90* out, whatever, so for good measure I put a couple of alignment marks on the case.
NOTE: Anytime you are dealing with machined case halves it's a good idea to make some form of mark to ensure you put it back together as it was manufactured.
|
|
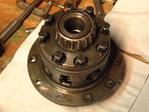
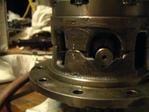
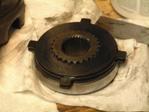
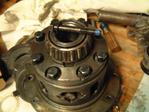
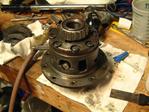
Spider Crossshaft 1
Spider Crossshaft 2
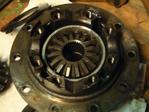
Spider Crossshaft 3
|
The next three pics show the meat of the PowerLok. Most differentials spider gears are installed on non-moving shafts. In the PL the crossshafts are pressed against the housing by the tension of the clutch plates. Under power, the force on the spiders cause the crossshafts to begin to seperate. This action puts more force on the clutch packs in effect creating more spring tension and forcing more power to the ground.
Top pic shows the two cross shafts nice and comfy in their home.
Middle pic shows one cross shaft removed and the final pic shows the spider gear that mates with the axle shaft. This spider has splines that engage in a cone shaped spacer which rides against the clutch pack.
|
|
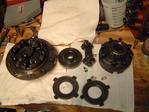
Parts is Parts
|
Here is the unit all apart, spread out and looking good. Interesting thing here
is that the clutches nearly fell off in my hands. I found out later that the
new ones have an interference fit and require some pressure to install.
|
|
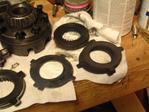
New Clutches
|
The new clutches. The package includes two convex clutches with tabs that
engage in the PL housing, four flat plates that engage on the outer spiders
and four center plates.
|
|
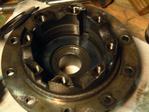
Left Case Half
|
Assembly starts! Be sure to have some friction modifier handy for the
clutch plates. Lube up the entire clutch assembly with friction
modifier and save the rest to throw in the axle once it is assembled.
|
|
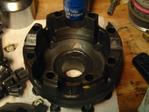
Right Case Half
|
The first plate to go in is the convex one. Here is where you can
mofify the action of the PL. Picture the clutch assembled in the
differential case. looking from either side the very first plate is
the convex plate. By turning the plate so it is concave you increse
the tension on the clutch pack - in other words you get a more
agressive limited slip.
|
|
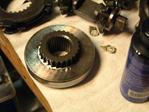
Clutch Block
|
Here is the backside of the side spider gear. You see the splines on
the spider engaged with the cone shaped clutch block. It may seem like
you should place the clutch plates in the differential housing and then
insert the splined spider/cone assy. Wrong! The clutch plates that
engage on the spider splines have an interference fit. See the next
pic!
|
|
Clutch Pack
|
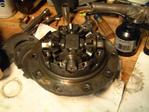
Assembly of the clutch pack goes like this. First plate has dog ears,
second plate engages on the splines (use a socket and rubber mallet to
seat the plate), third another plate with dog ears, and so on until
you reach the final convex plate.
|
|
Assembled Pack
|
Here is the final assembly before being placed in the case half. Be
careful when placing the clutch pack in the housing. The clutch block
has very close tolerances and will get wedged easily if not installed
properly.
|
|
Assembly
|
Once the clutches are in the case halfs, replace the spider crossshafts and
slide the cases together. Pay attention to the alignment marks! The case
bolts have substantial lockwashers but even so a little locktite helps
guarantee the case will not seperate out on the trail. Tighten the bolts
criss-crossing as you go to make sure the cases are brought together
evenly. Once they are snug, torque them to 35 ft/lbs.
|
|
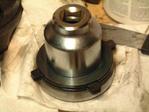
Freshened Powerlok
|
And here it is... the most fabulous object in the world... a like new
PowerLok ready for installation! (say? were you expecting a new
kitchenette?)
|
|


)